Reversi tutorial
Here we explain how to make a simple Reversi game, from scratch, using PlayN. You may wish to read the overview before doing this tutorial, or just jump in and then refer back to the overview if you run into anything confusing.
Note: this tutorial assumes you know how to program in Java. If you’ve never written Java code but know some other language pretty well, you’ll probably be fine. If you’re new to Java and programming, you’ll need to work through a proper Java tutorial first, because we’re not going to spell out every tiny detail here.
Before we get started, you need to do two important things:
- Set up your development environment
- Create a skeleton game
For the second step, this tutorial will assume that you used the following configuration when creating your skeleton game:
groupId-io.playn.tutorialartifactId-reversiversion-1.0-SNAPSHOTpackage-reversiJavaGameClassName-Reversi
You can use whatever you like, but when we talk about particular classes, you’ll have to remember to mentally translate the names.
If you are having trouble getting Maven archetype generation working, or you just don’t want to bother, you can clone the Reversi tutorial project from Github. It contains the results of invoking the Maven archetype generator with our suggested values.
Assuming you have a skeleton project, make sure you can run it and see the default rainbow background:
cd reversi
mvn test -Pjava
If you’re using an IDE, follow the same procedure outlined in the development environment instructions for running the game via your IDE.
You should see a window like this:
If you see the rainbow, then we’re off to the races!
Modeling
The first thing we need to do is come up with a data model for our game. This doesn’t have anything in particular to do with PlayN, but we can’t get to any of the PlayN parts until we do it.
Reversi is a pretty simple game. There are two kinds of pieces, black and white. The board is 8x8 but we’ll structure things to support arbitrary sizes. Players take turns placing pieces, so we need to keep track of who’s turn it is. That’s about it. We’ll also need the logic of figuring out whether a move is legal and which pieces to flip over when a move is made. These are closely related because a move is only legal if it flips over at least one piece.
To keep things simple, we’ll declare an enum to represent the two kinds of pieces, use a player’s
respective piece to determine whether it’s their turn, and use a reactive map from a board
coordinate to the piece that occupies it. Edit Reversi.java thusly:
public class Reversi extends SceneGame {

  public static enum Piece { BLACK, WHITE }

  public static class Coord {
    public final int x, y;

    public Coord (int x, int y) {
      assert x >= 0 && y >= 0;
      this.x = x;
      this.y = y;
    }

    public boolean equals (Coord other) {
      return other.x == x && other.y == y;
    }
    @Override public boolean equals (Object other) {
      return (other instanceof Coord) && equals((Coord)other);
    }
    @Override public int hashCode () { return x ^ y; }
    @Override public String toString () { return "+" + x + "+" + y; }
  }

  public final int boardSize = 8;
  public final RMap<Coord,Piece> pieces = RMap.create();
  public final Value<Piece> turn = Value.create(null);

  // ...
}
Value and RMap are from the React reactive programming library. They allow us to build a model which automatically supports adding listeners which are notified when anything changes. We’ll see how that works below when we start wiring things up.
If you cloned the Reversi tutorial project, you can see the code up to now by looking at the modeling branch.
Drawing
Now that we have a basic model for our game, we can jump right into drawing it. We’ll get to game logic and the general flow of the game later. We want to get something on the screen first because we love pretty pictures.
Drawing the board
We’re going to create a Layer which draws the game board, so let’s call it BoardView. We’ll
start by just drawing the board grid and then work our way up to the pieces.
public class BoardView extends Layer {
  private static final float LINE_WIDTH = 2;
  private final Reversi game;

  public final float cellSize;

  public BoardView (Reversi game, IDimension viewSize) {
    this.game = game;
    float maxBoardSize = Math.min(viewSize.width(), viewSize.height()) - 20;
    this.cellSize = (float)Math.floor(maxBoardSize / game.boardSize);
  }

  // we want two extra pixels in width/height to account for the grid lines
  @Override public float width () { return cellSize * game.boardSize + LINE_WIDTH; }
  @Override public float height () { return width(); } // width == height

  @Override protected void paintImpl (Surface surf) {
    surf.setFillColor(0xFF000000); // black with full alpha
    float top = 0, bot = height(), left = 0, right = width();

    // draw lines from top to bottom for each vertical grid line
    for (int yy = 0; yy <= game.boardSize; yy++) {
      float ypos = yy*cellSize+1;
      surf.drawLine(left, ypos, right, ypos, LINE_WIDTH);
    }

    // draw lines from left to right for each horizontal grid line
    for (int xx = 0; xx <= game.boardSize; xx++) {
      float xpos = xx*cellSize+1;
      surf.drawLine(xpos, top, xpos, bot, LINE_WIDTH);
    }
  }
}
We override width and height, which is not strictly necessary, but it will be convenient later
when we’re doing the math to decide where to position the board view in the main game view.
The method that does all the work is paintImpl. Every Layer draws itself to a Surface. This
is an accelerated drawing API where every drawing command results in a quad getting added to a
QuadBatch for eventual rendering by the GPU. In this case, we’re drawing some lines. Lines are
just really skinny quads which are filled, in this case, by a solid color. We could also use
Surface.setFillPattern to fill them with a texture, if we wanted to be fancy.
We choose a line thickness of two because that ensures that the board remains an even number of pixels in size. If the board is an odd size, then when we center it in the display it’s drawn on a half-pixel boundary which can result in blurriness or pixels in unexpected places. So that’s something to keep in mind when you’re laying things out.
Now let’s wire up our Model and BoardView so that we can actually see something show up on the
screen. We’ll also get rid of that rainbow background. Change the Reversi constructor thusly:
  public Reversi (Platform plat) {
    super(plat, 33); // update our "simulation" 33ms (30 times per second)

    // figure out how big the game view is
    final IDimension size = plat.graphics().viewSize;

    // create a layer that just draws a grey background
    rootLayer.add(new Layer() {
      protected void paintImpl (Surface surf) {
        surf.setFillColor(0xFFCCCCCC).fillRect(0, 0, size.width(), size.height());
      }
    });

    // create and add a board view
    rootLayer.addCenterAt(new BoardView(this, size), size.width()/2, size.height()/2);
  }
Note that by having the BoardView know its size, we can use the addCenterAt method, which
positions a layer’s center at a specified position. In our case we want the center of the board at
the center of the whole game view.
When you run the game, you should now see a nice grid on a grey background:
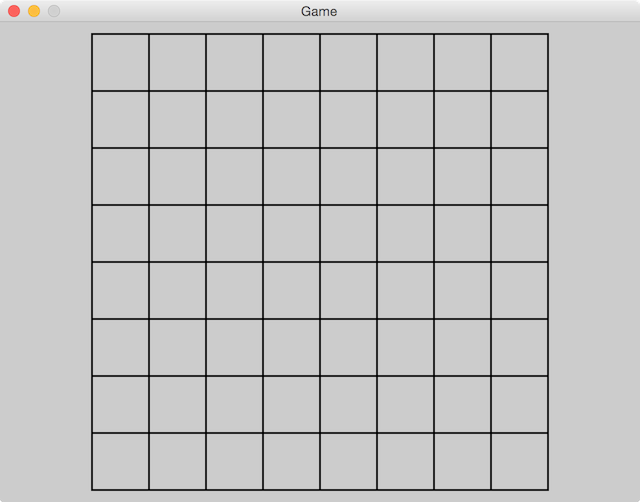
You can see the code up to this point by looking at the drawing-board branch.
Drawing the pieces
That’s a nice grid, now let’s draw some pieces. We could just modify BoardView to draw piece
textures directly after it is done drawing the grid, but for a variety of reasons, it will turn out
to be easier to have each piece placed into its own ImageLayer, so we’ll do it that way.
The BoardView is just for drawing the grid, so let’s introduce a GameView class which will
contain the board as well as the pieces on top of it. The game view will be a GroupLayer, which
is a layer that contains children. It will contain the BoardView layer, as well as ImageLayers
for all the pieces. We’ll start by just putting the BoardView in it:
public class GameView extends GroupLayer {
  private final Reversi game;
  private final BoardView bview;
  private final GroupLayer pgroup = new GroupLayer();

  public GameView (Reversi game, IDimension viewSize) {
    this.game = game;
    this.bview = new BoardView(game, viewSize);
    addCenterAt(bview, viewSize.width()/2, viewSize.height()/2);
    addAt(pgroup, bview.tx(), bview.ty());
  }
}
and change Reversi.java thusly:
-    // create and add a board view
-    rootLayer.addCenterAt(new BoardView(this, size), size.width()/2, size.height()/2);
+    // create and add a game view
+    rootLayer.add(new GameView(this, size));
GameView contains the BoardView, and it contains another GroupLayer (pgroup) which is going
to contain the piece layers. We position pgroup at the same location that we position the board
view so that coordinates in bview and pgroup are the same, which will come in handy later.
Now we can get down to work on drawing some pieces. First we need to create some piece images,
which we’ll do using the Canvas API. Change GameView like so:
  private final Tile[] ptiles = new Tile[Piece.values().length];

  public GameView (Reversi game, IDimension size) {
    // ...

    // draw a black piece and white piece into a single canvas image
    float size = bview.cellSize-2, hsize = size/2;
    Canvas canvas = game.plat.graphics().createCanvas(2*size, size);
    canvas.setFillColor(0xFF000000).fillCircle(hsize, hsize, hsize).
      setStrokeColor(0xFFFFFFFF).setStrokeWidth(2).strokeCircle(hsize, hsize, hsize-1);
    canvas.setFillColor(0xFFFFFFFF).fillCircle(size+hsize, hsize, hsize).
      setStrokeColor(0xFF000000).setStrokeWidth(2).strokeCircle(size+hsize, hsize, hsize-1);

    // convert the image to a texture and extract a texture region (tile) for each piece
    Texture ptex = canvas.toTexture(Texture.Config.UNMANAGED);
    ptiles[Piece.BLACK.ordinal()] = ptex.tile(0, 0, size, size);
    ptiles[Piece.WHITE.ordinal()] = ptex.tile(size, 0, size, size);

    // dispose our pieces texture when this layer is disposed
    onDisposed(ptex.disposeSlot());
  }

  @Override public void close () {
    super.close();
    ptiles[0].texture().close(); // both ptiles reference the same texture
  }
We create a ptiles array to hold the Tile for each piece image. A Tile is just a sub-region
of a Texture. Though it is not particularly relevant in a game as simple as this, it’s good
practice to combine things into a single texture whenever possible to improve rendering
performance. In this case, both of our piece images are in a single Texture, but the Tile API
makes it simple to treat the region for each piece separately.
We do the actual piece drawing using the Canvas API. A piece is just a filled circle with a
stroked outline. Then we turn the canvas’s Image (which is a CPU memory bitmap) into a Texture
(which is a GPU memory bitmap) via toTexture. Note that toTexture also disposes the Canvas,
which is what we want because we don’t need the canvas any longer. This frees up resources sooner
than if we just waited for the Canvas to be garbage collected. Finally we obtain our Tiles.
The texture for the pieces is UNMANAGED (see the section on managed
textures in the overview). This is because we want the texture’s
lifetime to correspond to the lifetime of GameView, not the lifetime of the layers that will
actually display the texture. If you have a texture which is no longer needed after the layers
which display it are disposed, you can use a managed texture; the layers will use reference
counting to ensure that the texture is disposed when the last layer which is using it is disposed.
In this case, we’re going to use our piece texture in many image layers and there will be times
when we dispose all of our image layers before creating any new ones (which would trigger the
disposal of a managed texture). We don’t want our piece texture to be disposed at that time; we
want to keep it until the whole GameView is disposed. Thus we make it unmanaged and manually
dispose it.
The piece images are a bit smaller than the cell size so that they don’t overlap the grid lines or bump right up next to them; it looks a bit nicer. To avoid having to do a bunch of fiddly math, we position our pieces based on the center of a cell, as we’ll see below. We align the center of the piece to the center of the cell, so it doesn’t matter if the piece is the same size as the cell, or smaller, or bigger, it will always line up properly.
We could have made the texture the full size of the cell and just drawn a smaller circle inside it, but rendering blank pixels is just as expensive as rendering filled pixels, so it would lower rendering performance. That doesn’t matter in this simple game, but we’re trying to set a good example.
Now we can create an ImageLayer for each piece using our piece tiles.
Add to GameView a map to track the layer for each piece on the board, and three new methods:
  private final Map<Coord, ImageLayer> pviews = new HashMap<>();

  private ImageLayer addPiece (Coord at, Piece piece) {
    ImageLayer pview = new ImageLayer(ptiles[piece.ordinal()]);
    pview.setOrigin(Layer.Origin.CENTER);
    pgroup.addAt(pview, bview.cell(at.x), bview.cell(at.y));
    return pview;
  }

  private void setPiece (Coord at, Piece piece) {
    ImageLayer pview = pviews.get(at);
    if (pview == null) {
      pviews.put(at, addPiece(at, piece));
    } else {
      pview.setTile(ptiles[piece.ordinal()]);
    }
  }

  private void clearPiece (Coord at) {
    ImageLayer pview = pviews.remove(at);
    if (pview != null) pview.close();
  }
addPiece creates an ImageLayer to display a particular piece, positions it properly and adds it
to the scene graph. setPiece will add a new piece to the board, or update an existing piece. In
Reversi, we flip pieces over, so this will handle changing a piece from black to white or vice
versa. clearPiece will remove a piece from the board. Pieces are never removed in a Reversi game,
but this method will be used when we restart the game and remove all the pieces from the previous
game.
The Layer.close() method removes the layer from its parent and disposes any resources used by
that layer. In this case our piece layers contain non-managed textures, so the reference counting
they do on the underlying texture won’t have any effect. But if we had a layer that contained a
managed texture for which it was the sole user, when that layer was disposed (via close) it would
in turn dispose its texture, which can often simplify texture memory management.
In setPiece we use setOrigin on the ImageLayer to indicate that we want to position the layer
based on its center rather than its upper left (which is the default). We then ask the BoardView
for the center of the desired grid cell (bview.cell), which is a method we’ll need to add to
BoardView:
  /** Returns the offset to the center of cell {@code cc} (in x or y). */
  public float cell (int cc) {
    // cc*cellSize is upper left corner, then cellSize/2 to center,
    // then 1 to account for our 2 pixel line width
    return cc*cellSize + cellSize/2 + 1;
  }
Recall that we positioned pgroup and bview at the same location, so the local coordinate
returned by cell is just what we need to position the piece layer inside pgroup.
The last bit of wiring we need is to react to the addition of pieces to the Reversi.pieces map
and create or update views for those pieces. Add the following to the end of the GameView
constructor:
    game.pieces.connect(new RMap.Listener<Coord,Piece>() {
      @Override public void onPut (Coord coord, Piece piece) { setPiece(coord, piece); }
      @Override public void onRemove (Coord coord) { clearPiece(coord); }
    });
This adds a listener to the pieces reactive map which is notified whenever a map entry is put
or removed. We make the appropriate changes to our views in response to those events.
You can try running the game, but you won’t see pieces yet, because we haven’t initialized the
game state. We need to add a method to Reversi to do that and then call it.
  public Reversi (Platform plat) {
    // ...

    // create and add a game view
    rootLayer.add(new GameView(this, size));

    // start the game
    reset();
  }

  /** Clears the board and sets the 2x2 set of starting pieces in the middle. */
  private void reset () {
    pieces.clear();
    int half = boardSize/2;
    pieces.put(new Coord(half-1, half-1), Piece.WHITE);
    pieces.put(new Coord(half  , half-1), Piece.BLACK);
    pieces.put(new Coord(half-1, half  ), Piece.BLACK);
    pieces.put(new Coord(half  , half  ), Piece.WHITE);
    turn.updateForce(Piece.BLACK);
  }
Because we call reset after we create our GameView, the game view will already be listening
to the pieces map and be ready to hear about the pieces as they’re added to the reactive map.
Note that we use updateForce to update the turn in reset. This is because the turn might
currently be BLACK, and when a reactive value is updated with the same value, it normally
ignores it. But we want to force the value to notify its listeners regardless because this is the
start of a new game and we don’t want a stale value left over from a previous game to influence it.
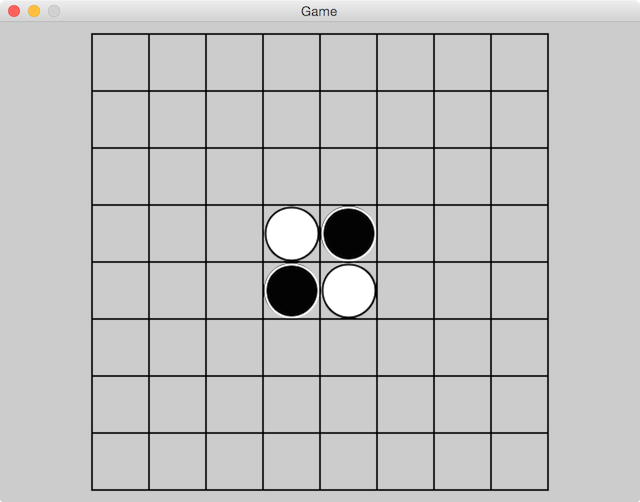
Now we can run the game and we should see pieces:
Now we’re ready to start working on game logic and flow.
You can see the code up to this point by looking at the drawing-pieces branch.
Logic and Game Flow
Before we handle user input, it will be useful to have the main game logic in place. So let’s sort that out. I’m not going to go into detail on the algorithm we use to process Reversi logic since this tutorial is teaching you how to use PlayN, not how to implement the game of Reversi. We’re just going to do the simplest possible thing that works.
Create a Logic.java class with the following code:
package reversi.core;

import java.util.ArrayList;
import java.util.List;
import java.util.Map;

import reversi.core.Reversi.Coord;
import reversi.core.Reversi.Piece;

/** "Does the math" for Reversi. */
public class Logic {
  public final int boardSize;

  public Logic (int boardSize) {
    this.boardSize = boardSize;
  }

  /** Returns true if the specified player can play a piece at the specified coordinate. */
  public boolean isLegalPlay (Map<Coord,Piece> board, Piece color, Coord coord) {
    if (!inBounds(coord.x, coord.y) || board.containsKey(coord)) return false;

    // look in each direction from this piece; if we see the other piece color and then one of our
    // own, then this is a legal move
    for (int ii = 0; ii < DX.length; ii++) {
      boolean sawOther = false;
      int x = coord.x, y = coord.y;
      for (int dd = 0; dd < boardSize; dd++) {
        x += DX[ii];
        y += DY[ii];
        if (!inBounds(x, y)) break; // stop when we end up off the board
        Piece piece = board.get(new Coord(x, y));
        if (piece == null) break;
        else if (piece != color) sawOther = true;
        else if (sawOther) return true;
        else break;
      }
    }

    return false;
  }

  /** Applies the specified play (caller must have already checked its legality).
    * Flips pieces as appropriate. */
  public void applyPlay (Map<Coord,Piece> board, Piece color, Coord coord) {
    List<Coord> toFlip = new ArrayList<>();
    // place this piece into the game state
    board.put(coord, color);
    // determine where this piece captures other pieces
    for (int ii = 0; ii < DX.length; ii++) {
      // look in this direction for captured pieces
      int x = coord.x, y = coord.y;
      for (int dd = 0; dd < boardSize; dd++) {
        x += DX[ii];
        y += DY[ii];
        if (!inBounds(x, y)) break; // stop when we end up off the board
        Coord fc = new Coord(x, y);
        Piece piece = board.get(fc);
        if (piece == null) break;
        else if (piece != color) toFlip.add(fc);
        else { // piece == color
          for (Coord tf : toFlip) board.put(tf, color); // flip it!
          break;
        }
      }
      toFlip.clear();
    }
  }

  /** Returns all legal plays for the player with the specified color. */
  public List<Coord> legalPlays (Map<Coord,Piece> board, Piece color) {
    List<Coord> plays = new ArrayList<>();
    // search every board position for a legal move; the force, it's so brute!
    for (int yy = 0; yy < boardSize; yy++) {
      for (int xx = 0; xx < boardSize; xx++) {
        Coord coord = new Coord(xx, yy);
        if (board.containsKey(coord)) continue;
        if (isLegalPlay(board, color, coord)) plays.add(coord);
      }
    }
    return plays;
  }

  private final boolean inBounds (int x, int y) {
    return (x >= 0) && (x < boardSize) && (y >= 0) && (y < boardSize);
  }

  protected static final int[] DX = { -1,  0,  1, -1, 1, -1, 0, 1 };
  protected static final int[] DY = { -1, -1, -1,  0, 0,  1, 1, 1 };
}
Then create a logic instance in Reversi.java:
  public final int boardSize = 8;
  // ...
  public final Logic logic = new Logic(boardSize);
Now we need to implement turn handling. When it is a particular player’s turn, we’re going to display all of their legal moves as partially transparent pieces. The player will click on one of the partially transparent pieces to make their move and we’ll process it and switch to the next player’s turn. If the other player has no moves then we end the game.
Let’s start by adding a method to GameView to display potential moves.
  public void showPlays (List<Coord> coords, Piece color) {
    final List<ImageLayer> plays = new ArrayList<>();
    for (Coord coord : coords) {
      ImageLayer pview = addPiece(coord, color);
      pview.setAlpha(0.3f);
      // TODO: listen for a click on pview and make that move
      plays.add(pview);
    }
  }
We’ll leave the input handling for the Input section. Next let’s wire up some logic in
Reversi which processes a turn:
  public static enum Piece {
    BLACK, WHITE;
    public Piece next () { return values()[(ordinal()+1) % values().length]; }
  }

  public Reversi (Platform plat) {
    // ...

    // create and add a game view
    final GameView gview = new GameView(this, size);
    rootLayer.add(gview);

    // wire up a turn handler
    turn.connect(new Slot<Piece>() {
      private boolean lastPlayerPassed = false;
      @Override public void onEmit (Piece color) {
        List<Coord> plays = logic.legalPlays(pieces, color);
        if (!plays.isEmpty()) {
          lastPlayerPassed = false;
          gview.showPlays(plays, color);
        } else if (lastPlayerPassed) {
          endGame();
        } else {
          lastPlayerPassed = true;
          turn.update(color.next());
        }
      }
    });

    // start the game
    reset();
  }

  private void endGame () {
    // TODO
  }
This listens for changes to the turn reactive value. When it changes, it computes the legal moves
for the current turn holder and displays them in the game view. If a player has no legal moves,
play passes back to the other player. If both players have no legal moves, the game ends. We’ll
handle ending the game later.
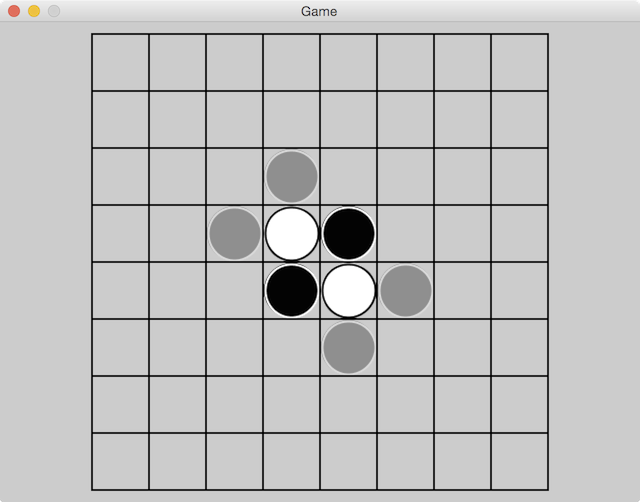
With all that in place, we can run the game now and should see the legal moves for the black player (who starts the game):
Now we can start wiring up user input.
You can see the code up to this point by looking at the logic branch.
Input
PlayN supports both Mouse and Touch input, as well as a unified input abstraction called Pointer, which provides a simple input model that can be fulfilled by either mouse or touch input. Pointer is useful in that you can support both kinds of input without extra effort. You can also augment a pointer-based UI with extra information from mouse or touch input as desired, which we’ll demonstrate here.
PlayN dispatches global input events which know nothing about the scene graph and layers, but the playn-scene library builds on that input support to provide event dispatch on a per-layer basis. It takes care of hit testing layers to determine which one is hit by a particular input interaction and dispatching events to handlers registered on that layer. This mechanism is described in more detail in the overview section on layer input.
The first thing we need to do to handle user input is to wire up dispatchers which deliver events
to the appropriate layers. We’ll do that in the Reversi constructor:
  public final Pointer pointer;

  public Reversi (Platform plat) {
    super(plat, 33); // update our "simulation" 33ms (30 times per second)

    // wire up pointer and mouse event dispatch
    pointer = new Pointer(plat, rootLayer, false);
    plat.input().mouseEvents.connect(new Mouse.Dispatcher(rootLayer, false));

    // ...
  }
Note that these are the playn.scene.Pointer and playn.scene.Mouse classes. Those extend the
playn.core.Pointer and playn.core.Mouse classes so that you can continue to refer to the event
classes as Pointer.Event and Mouse.Event without additional imports.
With those event dispatchers wired up, we can now register event listeners on layers and we’ll be
notified of events. Just add a pointer listener to our potential play layers and BAM! we have a
nearly working game. Change GameView.showPlays thusly:
  public void showPlays (List<Coord> coords, final Piece color) {
    final List<ImageLayer> plays = new ArrayList<>();
    for (final Coord coord : coords) {
      ImageLayer pview = addPiece(coord, color);
      pview.setAlpha(0.3f);
      // when the player clicks on a potential play, commit that play as their move
      pview.events().connect(new Pointer.Listener() {
        @Override public void onStart (Pointer.Interaction iact) {
          // clear out the potential plays layers
          for (ImageLayer play : plays) play.close();
          // apply this play to the game state
          game.logic.applyPlay(game.pieces, color, coord);
          // and move to the next player's turn
          game.turn.update(color.next());
        }
      });
      plays.add(pview);
    }
  }
While we’re fiddling with that code, let’s use the Mouse dispatcher we wired up to give some
feedback when the player hovers the mouse over a potential play. This won’t do anything on
touch-only platforms, but it’s nice to give extra feedback when and where we can.
      // when the player hovers over a potential play, highlight it
      pview.events().connect(new Mouse.Listener() {
        @Override public void onHover (Mouse.HoverEvent event, Mouse.Interaction iact) {
          iact.hitLayer.setAlpha(event.inside ? 0.6f : 0.3f);
        }
      });
Now when you hover the mouse over a potential play, it becomes slightly less ghostly. Note that we
use iact.hitLayer inside the event listener. That contains a reference to the layer that was
“hit” by the interaction in question. In this case, it’s the layer that’s being hovered over. We
could have just made pview final and used that in the event listener, but with this approach we
could reuse the same hover event listener on multiple layers if we so desired.
We’re in the home stretch gameplay-wise, so let’s now handle ending the game when no moves remain
for either player. We’ll display a message indicating who won, and allow the game to be restarted
with a click. Fill in Reversi.endGame:
  private void endGame () {
    // count up the pieces for each color
    Piece[] ps = Piece.values();
    int[] count = new int[ps.length];
    for (Piece p : pieces.values()) count[p.ordinal()]++;

    // figure out who won
    List<Piece> winners = new ArrayList<>();
    int highScore = 0;
    for (int ii = 0; ii < count.length; ii++) {
      int score = count[ii];
      if (score == highScore) winners.add(ps[ii]);
      else if (score > highScore) {
        winners.clear();
        winners.add(ps[ii]);
        highScore = score;
      }
    }

    // if we have only one winner, they win; otherwise it's a tie
    StringBuilder msg = new StringBuilder();
    if (winners.size() == 1) msg.append(winners.get(0)).append(" wins!");
    else {
      for (Piece p : winners) {
        if (msg.length() > 0) msg.append(" and ");
        msg.append(p);
      }
      msg.append(" tie.");
    }
    msg.append("\nClick to play again.");

    // render the game over message and display it in a layer
    IDimension vsize = plat.graphics().viewSize;
    TextBlock block = new TextBlock(plat.graphics().layoutText(
      msg.toString(), new TextFormat(new Font("Helvetica", Font.Style.BOLD, 48)),
      new TextWrap(vsize.width()-20)));
    Canvas canvas = plat.graphics().createCanvas(block.bounds.width()+4, block.bounds.height()+4);
    canvas.setFillColor(0xFF0000FF).setStrokeColor(0xFFFFFFFF).setStrokeWidth(4f);
    block.stroke(canvas, TextBlock.Align.CENTER, 2, 2);
    block.fill(canvas, TextBlock.Align.CENTER, 2, 2);
    final ImageLayer layer = new ImageLayer(canvas.toTexture());
    rootLayer.addFloorAt(layer, (vsize.width()-canvas.width)/2, (vsize.height()-canvas.height)/2);

    // when the player clicks anywhere, restart the game
    pointer.events.connect(new Slot<Pointer.Event>() {
      @Override public void onEmit (Pointer.Event event) {
        if (event.kind.isStart) {
          layer.close();
          reset();
          pointer.events.disconnect(this);
        }
      }
    });
  }
We figure out who one (or if the game was a tie), and create a message to be displayed to convey
that to the user. We use Graphics.layoutText to format the message using the platform’s
built-in font rendering facilities. We then use TextBlock to render that message into a Canvas
with CENTER alignment. The text is rendered with an outline, which is why we first stroke it and
then fill the same text over top of the stroke. That ensures that the message contrasts against
whatever black or white pieces it’s drawn over.
Finally, we connect a global Pointer.events listener that waits for a pointer start event and
then triggers a game restart. We use a global listener here instead of listening on a particular
layer because we want the user to be able to click anywhere to restart the game.
That’s it, now you can play a full game of Reversi! When you finish your game, you should see something like this:

It’s not the most stunning graphic design, but that’s what you get when you let programmers run wild.
You can see the code up to this point by looking at the input branch.
Audio
Let’s play a simple sound effect when a piece is placed on the board. Download the “Release Click” MP3 from this website (or pick one that you like better).
Now put that sound into your project as:
assets/src/main/resources/assets/sounds/click.mp3
You’ll have to create the sounds directory as it doesn’t exist by default.
Playing the sound is quite simple. Just modify GameView.java like so:
  private final Sound click;

  public GameView (Reversi game, IDimension viewSize) {
    // ...
    this.click = game.plat.assets().getSound("sounds/click");
    // ...
  }

  // in showPlays()
    // ...
    game.logic.applyPlay(game.pieces, color, coord);
    click.play();
    // ...
Notice that we don’t supply the .mp3 suffix when loading the sound. All backends support the
MP3 format, but some backends (like iOS with CAFF) have other formats that are recommended for
better performance. Thus each platform will look for sounds in its preferred format before falling
back to .mp3. This allows you to convert your sounds during your build process, or ahead of time,
and to bundle the appropriate versions of your sounds with the particular backend for which you’re
building.
You can see the code up to this point by looking at the audio branch.
Bling
We’ve made a basic Reversi game and covered a bunch of basic PlayN functionality, so our job is essentially done. But the game seems a little dull. Let’s see if we can’t spice things up a bit before we call it a day.
PlayN does not ship with classes to do animation or higher level user interface, but there’s a library which does, called TriplePlay. We’ll add that to our build and then use its animation framework to do some fun stuff.
Edit reversi/core/pom.xml and add a TriplePlay dependency:
    <dependency>
      <groupId>com.threerings</groupId>
      <artifactId>tripleplay</artifactId>
      <version>${playn.version}</version>
    </dependency>
TriplePlay is updated on the same version schedule as PlayN, so it’s usually a good idea to use
${playn.version} to ensure that you have the version of TriplePlay that’s meant for the version
of PlayN that you’re using.
Note that if you plan to build the HTML version of your game, follow the
instructions for adding TriplePlay to your
html module as well.
Now we can use the TriplePlay Animator class to bring our pieces to life. Add it to
Reversi.java:
  public final Animator anim;

  public Reversi (Platform plat) {
    super(plat, 33); // update our "simulation" 33ms (30 times per second)

    // create an animator for some zip zing
    anim = new Animator(paint);
    // ..
  }
We pass it the paint signal which is a signal emitted by our game on every frame with a Clock
that contains timing information. The animator uses that to process animations on every frame.
Now we can use the animator to put our pieces onto the board with a bit more flare. Change
GameView.java like so:
  private void setPiece (Coord at, Piece piece) {
    ImageLayer pview = pviews.get(at);
    if (pview == null) {
      pviews.put(at, pview = addPiece(at, piece));
      // animate the piece view "falling" into place
      pview.setVisible(false).setScale(2);
      game.anim.setVisible(pview, true).then().
        tweenScale(pview).to(1).in(500).bounceOut();
      game.anim.delay(250).then().play(click);
      game.anim.addBarrier();

    } else {
      pview.setTile(ptiles[piece.ordinal()]);
    }
  }
This creates an animation which smoothly scales the piece from 2x to 1x using a bounceOut
interpolator which smoothly transitions to its target value, but then bounces back a bit and cycles
through a few bounces each decayed from the last. Because we’re applying this interpolated value to
the piece’s scale, it makes the piece look like it’s dropping down onto the board and bouncing a
bit when it lands. The graph of the bounceOut interpolator looks like
this.
We also create an animation which delays a certain amount of time (250ms in this case) and then plays our click sound. We want to time the sound with the animation so that the click plays when the piece appears to “hit” the board for the first time. We could probably improve this effect by finding a click sound that includes a little rattle after the first click, but I’m even worse at finding good sounds than I am at drawing good graphics, so I’ll leave that as an exercise for the reader.
Be sure to remove the click.play() call from showPlays(). We’re now timing the sound to go with
the animation, so we play it in a different place.
Finally we call addBarrier which tells the animator: don’t start any new animations until the
ones that I just queued up are completed. This ensures that even though four setPiece calls come
in in rapid succession when the game first starts, the animations for each of them proceed one
after another. We’ll use addBarrier in a few places to make sure that things don’t happen until
we want them to.
This is why we setVisible(false) on our layers immediately after getting them from addPiece.
addPiece adds the layer to the scene graph, so if we didn’t make them invisible, they’d show up
immediately and sit there looking weird until their animation started. So we make them invisible
and the first thing the animation does is make them visible again, and then it starts tweening
their scale.
If you play the game, you’ll notice that the potential moves for the next turn show up immediately, even before the animation for the current play finishes, so let’s fix that.
In showPlays() make the following change:
-      pview.setAlpha(0.3f);
+      // fade the piece in
+      pview.setAlpha(0);
+      game.anim.tweenAlpha(pview).to(0.3f).in(300);
That will cause the potential move pieces to be set to alpha 0 when they are first added, so they’ll be invisible until their animations start, then we tween their alpha to 0.3f using the animator which ensures that they don’t fade in until all the piece dropping animations are done.
We don’t put an addBarrier call here, because we want all the potential move pieces to fade in at
the same time. In the absence of barriers the Animator runs all the animations it knows about in
parallel.
Now things are looking better, but there’s another thing we should fix. When a player makes their move, the pieces that are flipped over as a result of that move are flipped immediately, without regard to animation scheduling. Let’s make those follow the animation schedule and make the flip a bit fancier while we’re at it.
We’ll use a custom QuadBatch to render the flipping pieces with a 3D transform that makes them look like they’re actually flipping over. Explaining the 3D math that underlies this custom quad batch is beyond the scope of this tutorial, but if you’re into that sort of thing, it’s not too complicated. The “stock” PlayN shader doesn’t do any 3D transformation because it expects you to be making a 3D game. This new shader will tweak the stock shader a bit and apply a specific 3D transform to the quad being rendered which rotates it along a y-axis-aligned vector with the eye (or camera) at a specified screen coordinate location.
Create a new file FlipBatch.java:
package reversi.core;

import playn.core.GL20;
import playn.core.TriangleBatch;

import tripleplay.shaders.ShaderUtil;

public class FlipBatch extends TriangleBatch {

  /** The angle of rotation. */
  public float angle;

  /** The current "eye" position in screen coordinates. */
  public float eyeX, eyeY;

  public FlipBatch (GL20 gl, final float zScale) {
    super(gl, new Source() { @Override public String vertex () {
      return FlipBatch.vertex(zScale);
    }});
    uAngle = program.getUniformLocation("u_Angle");
    uEye = program.getUniformLocation("u_Eye");
  }

  @Override public void begin (float fbufWidth, float fbufHeight, boolean flip) {
    super.begin(fbufWidth, fbufHeight, flip);
    program.activate();
    gl.glUniform1f(uAngle, angle);
    gl.glUniform2f(uEye, eyeX, eyeY);
  }

  private final int uAngle, uEye;

  protected static String vertex (float zScale) {
    return TriangleBatch.Source.VERT_UNIFS +
      "uniform float u_Angle;\n" +
      "uniform vec2 u_Eye;\n" +
      TriangleBatch.Source.VERT_ATTRS +
      TriangleBatch.Source.PER_VERT_ATTRS +
      TriangleBatch.Source.VERT_VARS +

      "void main(void) {\n" +
      // Transform the vertex per the normal screen transform
      "  mat4 transform = mat4(\n" +
      "    a_Matrix[0],      a_Matrix[1],      0, 0,\n" +
      "    a_Matrix[2],      a_Matrix[3],      0, 0,\n" +
      "    0,                0,                1, 0,\n" +
      "    a_Translation[0], a_Translation[1], 0, 1);\n" +
      "  vec4 pos = transform * vec4(a_Position, 0, 1);\n" +

      // Rotate the vertex per our 3D rotation
      "  float cosa = cos(u_Angle);\n" +
      "  float sina = sin(u_Angle);\n" +
      "  mat4 rotmat = mat4(\n" +
      "    cosa, 0, sina, 0,\n" +
      "    0,    1, 0,    0,\n" +
      "   -sina, 0, cosa, 0,\n" +
      "    0,    0, 0,    1);\n" +
      "  pos = rotmat * vec4(pos.x - u_Eye.x,\n" +
      "                      pos.y - u_Eye.y,\n" +
      "                      0, 1);\n" +

      // Perspective project the vertex back into the plane
      "  mat4 persp = mat4(\n" +
      "    1, 0, 0, 0,\n" +
      "    0, 1, 0, 0,\n" +
      "    0, 0, 1, -1.0/2000.0,\n" +
      "    0, 0, 0, 1);\n" +
      "  pos = persp * pos;\n" +
      "  pos += vec4(u_Eye.x,\n" +
      "              u_Eye.y, 0, 0);\n" +

      // Finally convert the coordinates into OpenGL space
      "  pos.xy /= u_HScreenSize.xy;\n" +
      "  pos.z  /= (u_HScreenSize.x * " + ShaderUtil.format(zScale) + ");\n" +
      "  pos.xy -= 1.0;\n" +
      // z may already be rotated into negative space so we don't shift it
      "  pos.y  *= u_Flip;\n" +
      "  gl_Position = pos;\n" +

      TriangleBatch.Source.VERT_SETTEX +
      TriangleBatch.Source.VERT_SETCOLOR +
      "}";
  }
}
Next we’ll create this batch and ensure that it’s properly disposed when our GameView goes away:
  private final FlipBatch flip;

  public GameView (Reversi game, IDimension viewSize) {
    // ...
    this.flip = new FlipBatch(game.plat.graphics().gl, 2);
    // ...
  }

  @Override public void close () {
    super.close();
    flip.close();
  }
The actual flipping happens in setPiece, so we’ll change that:
  private void setPiece (Coord at, Piece piece) {
    ImageLayer pview = pviews.get(at);
    if (pview == null) {
      // ..

    } else {
      final ImageLayer fview = pview;
      final Tile tile = ptiles[piece.ordinal()];
      final Point eye = LayerUtil.layerToScreen(pview, fview.width()/2, fview.height()/2);
      Animation.Value flipAngle = new Animation.Value() {
        public float initial () { return flip.angle; }
        public void set (float value) { flip.angle = value; }
      };
      game.anim.
        action(new Runnable() { public void run () {
          flip.eyeX = eye.x;
          flip.eyeY = eye.y;
          fview.setBatch(flip);
        }}).
        then().tween(flipAngle).from(0).to(FloatMath.PI/2).in(150).
        then().action(new Runnable() { public void run () {
          fview.setTile(tile);
        }}).
        then().tween(flipAngle).to(FloatMath.PI).in(150).
        then().action(new Runnable() { public void run () {
          fview.setBatch(null);
        }});
      game.anim.addBarrier();
    }
  }
There’s a lot going on here, so let’s break it down. First we figure out the screen coordinates for
the center of the piece that we’ll be flipping. We also create an Animation.Value to wrap the
angle exposed by `FlipBatch. This allows a tween animation to change that value as an animation
progresses.
Then we create our animation sequence. The first thing we do is to use an action to configure the
eye on the FlipBatch and configure the ImageLayer displaying our potential move with the
FlipBatch. Then we tween the flip angle from 0 to PI/2, which rotates the layer to the halfway
point, then we use another action to switch the tile displayed by the ImageLayer from the old
color to the new color, then we tween the angle the rest of the way (PI/2 to PI). Finally we clear
out the batch, and add a barrier so that each of these animations proceeds one after another.
In this case, it’s essential that we run these animations serially. If we tried to run multiple
flip animations in parallel, the code that changes FlipBatch.eyeX and eyeY would all run at the
same time and only the last layer’s values would be used for all of the layers. This would make
things look weird for all the layers except the last one. If we wanted to run all the flips in
parallel, we’d have to write the FlipBatch differently so that the eye position was part of
each quad’s data. That wouldn’t be super hard, but it would complicate things quite a bit.
You can see the code up to this point by looking at the bling branch.
Conclusion
Now we have a Reversi game that, programmer art aside, we could show to our friends without feeling too embarrassed. There are certainly many more things you could do to improve it, and now that you have an idea how PlayN’s main APIs work, perhaps you will.
The docs are there when you need to look things up. Now go forth and make awesome games!
Addendum: the tutorial is complete and I pushed all the code to Github, and then I discovered an annoying bug. Rather than rewrite history, I’m just going to own up to it here and show you how to fix it. The bug is that even though we set the alpha for possible move pieces to zero before we fade them in, if you hover over them while they’re at zero alpha, they’ll immediately become visible, which looks weird given that they shouldn’t really exist yet.
This is easy to fix, just use the same setVisible approach that we did with the other pieces that
we didn’t want to show up until they were ready. This is also more efficient because a layer with
alpha of 0 is still rendered, even though we draw a bunch of transparent pixels that don’t end up
changing the frame buffer. But a layer with visibility set to false is not drawn at all.
So change GameView.java like so:
-      pview.setAlpha(0);
-      game.anim.tweenAlpha(pview).to(0.3f).in(300);
+      pview.setVisible(false).setAlpha(0);
+      game.anim.setVisible(pview, true).then().tweenAlpha(pview).to(0.3f).in(300);